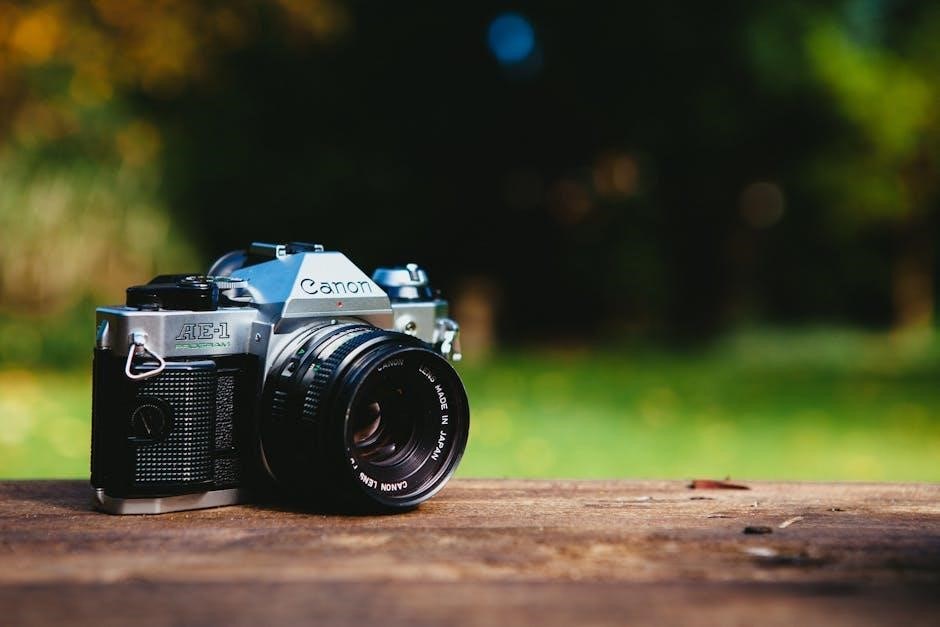
Canon AE-1 User Guide: A Comprehensive Overview
This guide simplifies the setup and use of the Canon AE-1‚ offering clear instructions and illustrations. It’s designed for both beginners and experienced photographers seeking to master this classic camera.
The Canon AE-1‚ released in 1976‚ quickly became one of the world’s most popular 35mm film cameras. Its success stemmed from a blend of innovative features‚ robust build quality‚ and relative affordability‚ making it accessible to a wide range of photographers. This camera represented a significant step forward in automated exposure‚ offering both shutter-priority and aperture-priority modes – a relatively new concept at the time.
This user guide aims to provide a comprehensive resource for anyone looking to understand‚ operate‚ and appreciate the Canon AE-1. Whether you’ve recently acquired one or are considering purchasing one‚ this guide will cover everything from the camera’s basic functions to more advanced techniques. We’ll delve into the intricacies of its light metering system‚ explore lens compatibility‚ and offer troubleshooting tips to ensure you get the most out of your photographic experience.
The Canon AE-1 isn’t just a camera; it’s a piece of photographic history. Its enduring appeal lies in its ability to deliver stunning images with a classic aesthetic. This guide will help you unlock its full potential and rediscover the joy of film photography;
Understanding the Camera Body
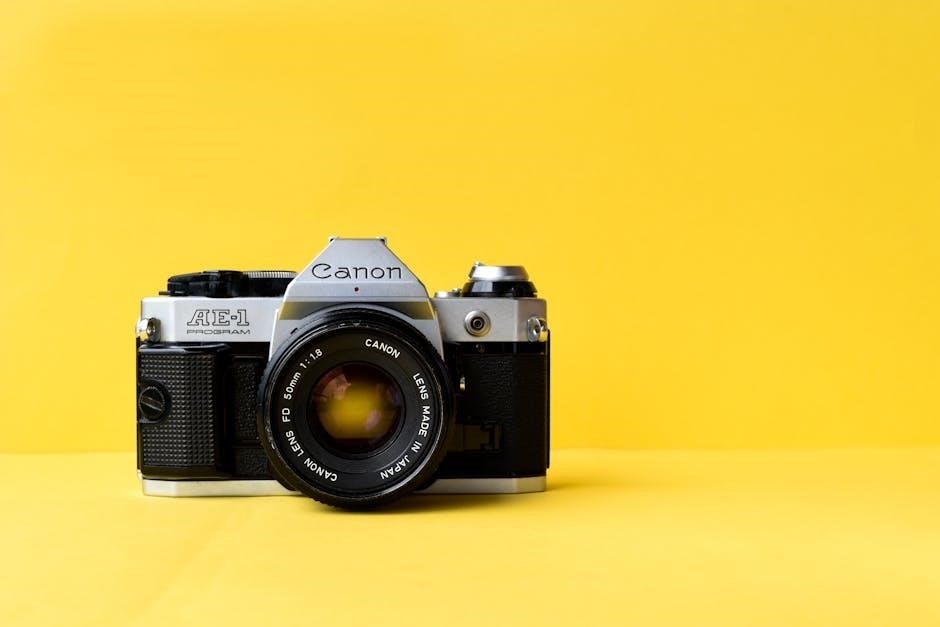
The Canon AE-1’s body is primarily constructed from metal‚ contributing to its durability and solid feel. Key components include the top plate‚ housing the shutter speed dial‚ exposure mode selector‚ and film advance lever. The bottom plate features the battery compartment and tripod mount. Examining the front reveals the lens mount‚ crucial for attaching compatible Canon FD lenses.
The rear of the camera houses the viewfinder‚ providing a clear view of the scene and displaying essential exposure information. Adjacent to the viewfinder is the film rewind crank‚ used to retract the film back into its canister after shooting. The camera’s right side features the shutter release button and a cable release socket.

Understanding the location and function of each control is vital for operating the AE-1 effectively. The camera’s ergonomic design aims for comfortable handling‚ though it may feel different compared to modern digital cameras. Familiarizing yourself with these physical aspects will lay a strong foundation for mastering the camera’s capabilities and enjoying the analog shooting experience.
Key Features and Specifications
The Canon AE-1 is renowned for its electronically controlled shutter and aperture priority exposure mode‚ a groundbreaking feature in 1976. It boasts a horizontally traveling cloth focal-plane shutter‚ offering speeds from 2 seconds to 1/1000th of a second‚ plus Bulb mode for long exposures. The built-in light meter utilizes a Silicon Photodiode (SPD) for accurate exposure readings.

Key specifications include: a standard 35mm film format‚ compatibility with Canon FD lenses‚ and a top film speed of ISO 3200. The camera operates on a 4LR44/PX28 battery‚ powering the light meter and electronic shutter. Its dimensions are approximately 143 x 87 x 48 mm‚ with a weight of around 590g without a lens.
The AE-1’s partially automatic exposure capabilities‚ combined with its robust build quality‚ made it a popular choice among both amateur and professional photographers. Its user-friendly design and reliable performance cemented its place as a classic in the history of 35mm photography‚ offering a blend of automation and manual control.
Loading Film into the Canon AE-1
Loading film into the Canon AE-1 is a straightforward process‚ essential for capturing images with this classic camera. First‚ locate the film chamber release on the camera’s left side. Press and lift the release to open the back cover. Next‚ insert a 35mm film cartridge into the film chamber‚ ensuring it sits securely.
Pull the film leader across the camera body and attach it to the take-up spool. Rotate the spool to ensure the film is securely engaged. Close the back cover until it clicks shut‚ automatically advancing the film slightly. The camera will now automatically rewind the film leader.
Advance the shutter speed dial and press the shutter release button several times to advance the film past the exposed leader. The frame counter will display the number of exposures remaining. Always ensure the film is properly loaded and advancing before beginning a shooting session to avoid wasted frames and potential damage to the camera.
Setting the Shutter Speed
The shutter speed dial on the Canon AE-1 controls the duration for which the camera’s sensor is exposed to light. Located on the top of the camera body‚ it offers a range of speeds‚ typically from 2 seconds to 1/1000th of a second. Understanding these settings is crucial for achieving properly exposed photographs.
Faster shutter speeds (e.g.‚ 1/500th or 1/1000th of a second) are ideal for freezing motion‚ capturing sharp images of fast-moving subjects like sports or wildlife. Slower shutter speeds (e.g.‚ 1/30th or 1/60th of a second) allow more light to enter the camera‚ suitable for low-light conditions or creating motion blur effects.
When handholding the camera‚ a general rule of thumb is to use a shutter speed that is at least equal to the reciprocal of the lens’s focal length to avoid camera shake. For example‚ with a 50mm lens‚ use a shutter speed of 1/50th of a second or faster. Experimenting with different shutter speeds allows for creative control over your images.
Controlling the Aperture

The aperture‚ controlled by the aperture ring on your Canon AE-1 lens‚ regulates the size of the lens opening‚ influencing both the amount of light reaching the sensor and the depth of field in your photographs. Aperture is measured in f-stops (e.g.‚ f/2.8‚ f/5.6‚ f/16). Lower f-stop numbers indicate a wider aperture‚ allowing more light and creating a shallow depth of field.
A wide aperture (e.g.‚ f/2.8 or f/4) is excellent for isolating subjects‚ blurring the background‚ and shooting in low light. Conversely‚ a narrow aperture (e.g.‚ f/11 or f/16) lets in less light but increases the depth of field‚ keeping more of the scene in focus – ideal for landscapes.
The AE-1’s aperture control is directly linked to the light meter‚ assisting in achieving correct exposure. Remember that each ‘stop’ change in aperture doubles or halves the amount of light entering the camera. Mastering aperture control is fundamental to achieving creative and technically sound images.
Understanding Exposure Modes
The Canon AE-1 offers a versatile range of exposure modes‚ granting photographers control over the relationship between aperture and shutter speed. Primarily‚ it features Shutter-Priority (Tv) and Aperture-Priority (Av) modes‚ alongside a fully manual mode for complete creative control.
In Shutter-Priority mode‚ you select the shutter speed‚ and the camera automatically sets the aperture for proper exposure. This is useful for freezing motion (fast shutter speed) or blurring it (slow shutter speed). Aperture-Priority mode allows you to choose the aperture‚ with the camera adjusting the shutter speed accordingly. This is ideal for controlling depth of field.
Manual mode requires you to set both aperture and shutter speed independently‚ relying on the built-in light meter as a guide. The AE-1 also features an automatic mode where the camera selects both settings. Understanding these modes empowers you to tailor your settings to specific shooting scenarios and artistic visions‚ achieving desired photographic results;
Using the Light Meter
The Canon AE-1’s built-in light meter is crucial for achieving correctly exposed photographs. Located within the viewfinder‚ it displays a needle indicating whether the scene is underexposed (-)‚ overexposed (+)‚ or correctly exposed (0). The meter operates in both Aperture-Priority and Shutter-Priority modes‚ as well as Manual mode‚ providing valuable guidance.
To use the meter‚ partially depress the shutter button to activate it. The needle will move‚ indicating the exposure level based on the light reflected from the scene. Adjust either the aperture or shutter speed (depending on your chosen mode) until the needle aligns with the ‘0’ mark. This signifies a balanced exposure.
Remember that the meter reads reflected light‚ and can be fooled by extremely bright or dark subjects. Exposure compensation (discussed later) can be used to fine-tune the meter’s reading in challenging situations. Regularly checking and understanding the light meter’s readings is fundamental to mastering the AE-1 and consistently capturing well-exposed images.
Focusing Techniques with the AE-1
Achieving sharp focus is paramount in photography‚ and the Canon AE-1 offers several techniques to ensure your subjects are crisp and clear. The primary method is using the split-image rangefinder in the viewfinder. This feature divides the central portion of the viewfinder into two sections; when perfectly focused‚ these sections will appear to merge into one cohesive image.
To focus‚ look through the viewfinder and rotate the focusing ring on the lens until the split image aligns. For precise focusing‚ especially in low light‚ utilize the microprism collar surrounding the split image. This area becomes easier to read when nearing accurate focus.
Depth of field plays a role; at smaller apertures (higher f-numbers)‚ a larger area will be in focus‚ making precise focusing less critical. Conversely‚ wider apertures require more careful focusing. Practice these techniques to develop muscle memory and consistently achieve sharp images with your Canon AE-1.
Depth of Field Explained
Depth of field (DoF) refers to the range of distance within a photograph that appears acceptably sharp. It’s a crucial concept for creative control and ensuring your intended subject‚ and potentially foreground or background elements‚ are in focus.
Three primary factors influence DoF: aperture‚ focal length‚ and distance to the subject. A wider aperture (smaller f-number like f/2.8) results in a shallow DoF‚ isolating the subject against a blurred background – ideal for portraits. Conversely‚ a narrower aperture (larger f-number like f/16) creates a large DoF‚ keeping more of the scene sharp – suitable for landscapes.
Longer focal lengths (telephoto lenses) generally produce shallower DoF than shorter focal lengths (wide-angle lenses) at the same aperture. Closer you are to your subject‚ the shallower the DoF. Understanding these relationships allows you to intentionally manipulate DoF to achieve your desired aesthetic with the Canon AE-1.
Canon AE-1 Lens Compatibility
The Canon AE-1 utilizes the Canon FD (Focusing Distinctive) lens mount. This mount system is characterized by a breech-lock design‚ requiring a twisting motion to lock and unlock lenses. The AE-1 is compatible with a vast array of FD lenses produced by Canon throughout the 1970s and 80s.

FD lenses are categorized into two main types: non-SSC (Super Spectral Coating) and SSC. SSC lenses‚ introduced later‚ feature improved coating to reduce flare and enhance contrast. While both types function perfectly with the AE-1‚ SSC lenses are generally preferred for their optical quality.
Adapters are available allowing the use of modern lenses with the AE-1‚ but functionality (like autofocus) will be lost. The FD mount offers a wide selection of lenses‚ from wide-angle to telephoto‚ providing photographers with diverse creative options. Ensure compatibility by verifying the FD mount when purchasing lenses for your Canon AE-1.
Using External Flash with the AE-1
The Canon AE-1 offers versatile flash photography capabilities when paired with compatible external flash units. Canon’s Speedlites designed for the FD mount system are ideal‚ providing full electronic synchronization for high-speed shooting. The camera’s hot shoe allows for direct connection and communication with compatible flashes.
For non-dedicated flashes (those without automatic TTL capabilities)‚ manual flash settings must be determined based on distance and aperture. The AE-1’s built-in light meter can assist in calculating appropriate exposure settings. Ensure the flash sync speed (typically 1/60th of a second) is not exceeded to avoid vignetting.
Utilizing flash effectively requires understanding the interplay between flash power‚ aperture‚ and shutter speed. Experimentation is key to achieving desired lighting effects. Consider using a flash diffuser to soften the light and reduce harsh shadows. Proper flash usage expands the AE-1’s photographic potential significantly.
Battery Installation and Maintenance
The Canon AE-1 utilizes a 4LR44 or equivalent 6V battery to power its electronic functions‚ primarily the light meter. Battery installation is straightforward: locate the battery compartment on the bottom of the camera and insert the battery following the polarity markings (+ and -). Ensure a secure connection for optimal performance.
Battery life varies depending on usage frequency and ambient temperature. Regularly check the battery indicator in the viewfinder. A dim or absent indicator signals the need for replacement. Avoid mixing old and new batteries‚ and always use high-quality batteries for reliable operation.
To prolong battery life‚ switch the camera off when not in use. Remove the battery if the camera will be stored for an extended period to prevent corrosion. Clean the battery contacts periodically with a soft‚ dry cloth. Proper battery care ensures consistent and accurate metering‚ enhancing your shooting experience.
Troubleshooting Common Issues
If the light meter isn’t functioning‚ first check the battery – a weak or incorrectly installed battery is the most common cause. Ensure the battery compartment is clean and the contacts are making good connection. If the issue persists‚ the meter itself may require professional servicing.
Shutter speed inaccuracies can sometimes occur. Verify the battery is fresh‚ as the electronic shutter is battery-dependent. If problems continue‚ a CLA (Clean‚ Lubricate‚ and Adjust) service by a qualified technician is recommended. Avoid attempting self-repair of the shutter mechanism.
Film advance issues often stem from a dirty film transport mechanism. Carefully inspect the rollers and rails for dust or debris. If the film isn’t advancing smoothly‚ do not force it. Seek professional assistance to prevent damage. Consistent maintenance prevents many of these problems‚ ensuring reliable operation of your Canon AE-1.
Basic Maintenance and Cleaning
Regular cleaning is crucial for maintaining your Canon AE-1’s performance. Use a soft‚ dry cloth to wipe down the camera body‚ avoiding harsh chemicals or abrasive cleaners. Gently dust the film chamber and lens mount with a blower to remove any particles.
The viewfinder should be cleaned with a lens cloth specifically designed for delicate optics. Avoid applying pressure‚ as this can damage the coating. Inspect the light seals around the film door periodically; deteriorating seals can cause light leaks. Replacement seals are readily available.
Lens care is paramount. Clean the lens elements with a lens brush and cleaning solution‚ applying it to the cloth‚ not directly to the lens. Store your AE-1 in a dry‚ dust-free environment when not in use. Proper storage and routine cleaning will extend the life of your camera and ensure optimal image quality.
Advanced Techniques: Exposure Compensation
Exposure compensation allows you to override the Canon AE-1’s light meter readings‚ crucial for challenging lighting scenarios. When shooting scenes with predominantly bright or dark tones‚ the meter can be fooled‚ resulting in under or overexposed images.
The AE-1’s exposure compensation dial‚ typically marked with + and ⎯ values‚ lets you adjust the exposure. Positive compensation (+ values) brightens the image‚ useful for dark subjects against a bright background. Negative compensation (- values) darkens the image‚ ideal for bright subjects against a dark background.
Understanding the scale is key. Each step of compensation alters the exposure by a specific amount. Experimentation is vital to learn how different settings affect your images. Practice with various scenes to develop an intuitive understanding of when and how to use exposure compensation effectively‚ achieving consistently well-exposed photographs.

Creative Photography with the Canon AE-1
The Canon AE-1’s manual controls unlock a world of creative possibilities beyond automatic modes. Experiment with different aperture settings to control depth of field – a shallow depth of field isolates your subject‚ while a larger depth of field keeps everything in focus.
Shutter speed manipulation allows you to capture motion blur or freeze action. Slow shutter speeds create a sense of movement‚ perfect for waterfalls or light trails. Fast shutter speeds freeze fast-moving subjects like birds in flight or sports action.
Explore double exposures by rewinding the film mid-roll and shooting over existing frames‚ creating surreal and artistic effects. Utilize different lenses to alter perspective and framing. Don’t be afraid to push the boundaries and discover your unique photographic style with this versatile camera!
Resources and Further Learning
Numerous online resources cater to Canon AE-1 users‚ offering tutorials‚ forums‚ and repair guides. Websites like Canon’s official support pages and photography-specific communities provide valuable information and troubleshooting assistance. Explore dedicated forums where enthusiasts share tips‚ experiences‚ and lens recommendations.
Consider investing in books specifically focused on the Canon AE-1 or classic film photography. These resources often delve deeper into technical aspects and creative techniques. YouTube channels offer visual demonstrations of camera operation‚ film loading‚ and shooting techniques.
Local camera stores may offer workshops or classes on film photography‚ providing hands-on learning opportunities. Don’t hesitate to connect with other photographers to exchange knowledge and inspiration. Online manuals and guides (as seen in various collections) can supplement your learning journey‚ ensuring a comprehensive understanding of your Canon AE-1.